Managing Individual Entity
Individual Entity
Adding an Entity
To add an individual entity, click the Main Menu and select Master Data > Entities > Individual (See diagram below). This will display a listing of individual entities. Click on New button to add a new record. A much quicker method to create an entity is to go to the quick launcher and type in TP001.
Figure 14 Entity Main Menu
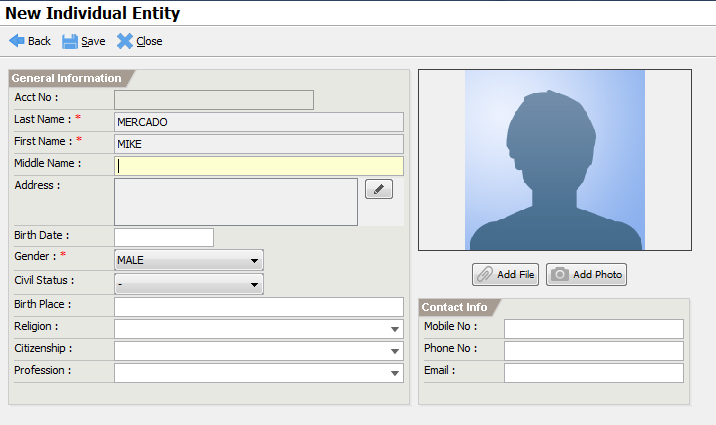
The new individual entity initial screen will be displayed. It asks first for basic information like lastname, firstname, middlename birthdate and gender. Fields marked with * are required. Once completed, click on the Next button.
Figure 15 New Individual Entity
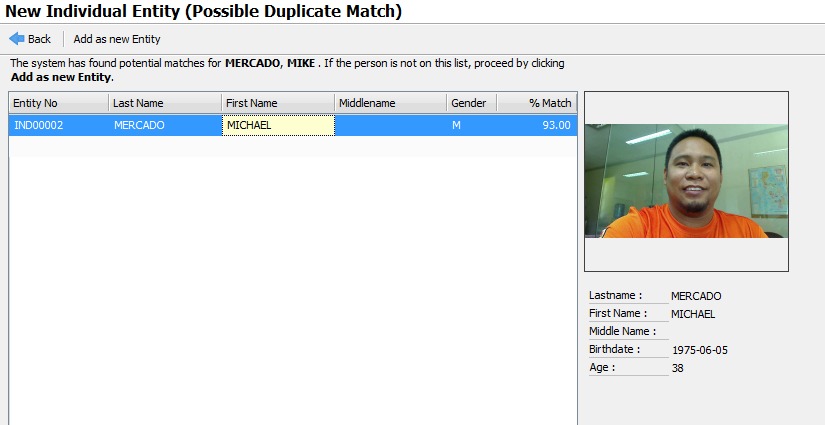
The system first attempts to check for duplicate matches if any. If there are no matches the system imimagestely directs you to the screen to complete the information.

Most fields are input boxes and filled by typing in text. The suggest controls like religion, citizenship and profession displays existing information which you can simply choose from. The address field is a special entry because address is not a simple plain text and there are several uses for it in the system. To edit the address, click on the address editor
next to the address box to display a popup entry. Choose the type of address you want to add
Local refers to local address (within the LGU) so barangay is specified. If it is outside the LGU, use non-local.
To make the system more accurate, it is suggested to add photos of the person so that in case there is a possible duplicate entry, it will be much easier to distinguish with the picture. There are two ways you can add photos, by uploading file or by capturing using a webcam. If you have a webcam available, try it first before implementing if it works. This feature has not undergone thorough testing of different webcams at this time.
Once completed, click on Save and the system will assign the entity no. This is the unique identifier of the person.
Checking for Duplicates
Having a unique single record of a person in the system is ideal because it helps in referencing transactions and improves the quality of the records. If this can be achieved, we will be able to know the transactions for a particular person which can shared across domains for example – real property information might be important in business permits and licensing if we are investigating if they reported the correct amount. Therefore, duplicate entries are not desirable because there is no way a system will be able to reference it. However this is simpler said than done because during day to day operations, especially during peak times, misspellings or wrong entries could occur.
To reduce possibility of duplicates, it is highly recommended that an LGU provide a separate department or personnel who will ensure that possible duplicates are checked before adding it in the database. However, because most LGUs cannot provide this at the moment, there is a built-in mechanism provided in the system to check for possible duplicate matches. It checks for possible matches by comparing the strings and providing a score of exactness. The higher score means higher probability being the same. A 100% will give an exact match for lastname and firstname. This gives a chance for review and alerts the person entering the record.

If the encoder is sure that this is another person, they can proceed by clicking on Add as new Entity to ignore the message. However, if it is an exact match, the system will not allow it to continue. In this case, a higher authority is needed having ENTITY.APPROVER role to encode the record.
Updating Records
When updating records, we need to search first the record we want to update. Go to the Individual Entities list Master Data > Entities > Individual. This will display the list of individual entities shown below:

Figure 16 Individual Entity Listing
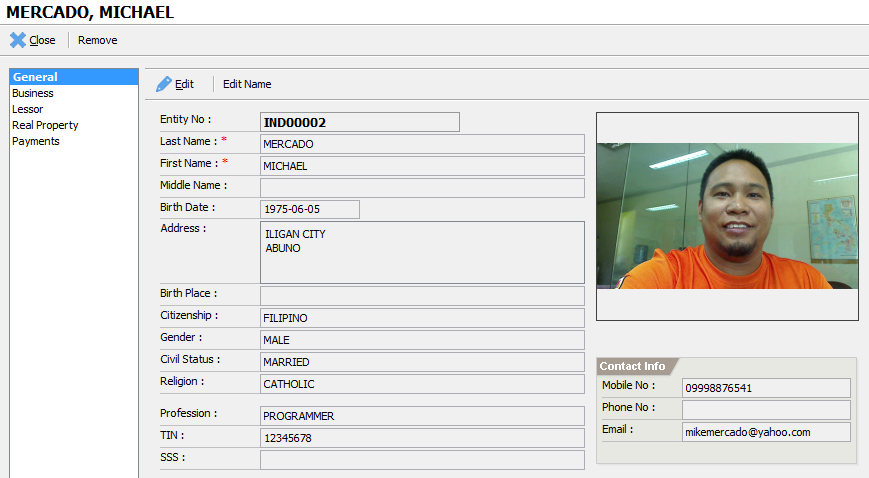
Use the search box in the upper right to search for the records based on the name. To open the record, highlight the record then click Open or double click the item. This will open the entity record.

Figure 17 Entity Information
To edit the record, click on Edit. This will display the editing screen.
Edit the necessary entries and click on Save to commit the data. In case
you want to edit the name, click on Edit Name. This is done because when
editing the name, we need to run the matching records again similar to
adding a new entry to ensure that the new information does not have
duplicate matches. Edit is allowed provided you have sufficient
permission.
On the left side are transactions related to the person. It lists businesses owned, leased buildings, real properties owned or they are part owner and payments. Since ETRACS is a pluggable platform, other information might be coming from other plug-in modules. This will give a complete picture of the transactions for a taxpayer.